Monday, December 3, 2018
Sunday, November 11, 2018
CodeIgniter Simple Login Form With Sessions
https://www.formget.com/form-login-codeigniter/
https://www.youtube.com/watch?v=7d_4CpA2uHI&t=3s
https://www.youtube.com/watch?v=7d_4CpA2uHI&t=3s
Tuesday, November 6, 2018
Selenium Webdriver FB login page Scripts
package package1;
import org.openqa.selenium.By;
import org.openqa.selenium.WebDriver;
import org.openqa.selenium.firefox.FirefoxDriver;
public class Tutorials {
public static void main(String[] args){
WebDriver driver=new FirefoxDriver();
driver.get("http://www.facebook.com");
driver.findElement(By.id("email")).sendKeys("yourUsername");
driver.findElement(By.id("pass")).sendKeys("yourPassword");
driver.findElement(By.id("u_0_n")).click();
}
}
Wednesday, October 17, 2018
Photoshop Shortcuts
- hold alt +right mouse -drag left or right (to change diameter of quick selection tool)
Layer
- Create new layer ==> Ctrl–Shift–N
- Select non-contiguous layers ==> Ctrl–click layers
- Select contiguous layers ==> Click one layer, then Shift–click another layer
- Delete Layer ==> Delete key (while in the Move tool)
- View contents of layer mask ==> Alt–click layer mask icon
- Temporarily turn off layer mask ==> Shift–click layer mask icon
- Clone layer as you move it ==> Alt–drag
- Find/Select layer containing object ==> Right–click on the object w/Move tool
- Change layer opacity ==> Number pad keys (w/Move tool selected)
- Cycle down or up through blending modes ==> Shift–Plus(+) or Minus(–)
- Change to a specific blending mode ==> (w/Move tool) Shift–Alt–letter (i.e.: N=Normal, M=Multiply. etc.)
- Switch to layer below/above current layer ==> Alt–[ or Alt–]
- Move layer below/above current layer ==> Ctrl–[ or Ctrl–]
- Fill selection with Background color ==> Ctrl–Backspace
- Fill selection with Foreground color ==> Alt–Backspace
- Fill selection with Foreground color using Lock Transparent Pixels ==> Shift–Alt–Backspace
- Fill selection with source state in History panel ==> Ctrl–Alt–Backspace
- Display Fill dialog box ==> Shift–Backspace
- Sample as background color ==> Alt–click w/Eyedropper tool
- To get Move tool ==> While in any painting/editing tool, hold Ctrl
- To get Eyedropper with painting tools ==> Alt
- Change paint opacity (with Airbrush OFF) ==> Number keys
- Change paint opacity (with Airbrush ON) ==> Shift–Number keys
- Change Airbrush flow (with Airbrush ON) ==> Number keys
- Change Airbrush flow (with Airbrush OFF) ==> Shift–Number keys
- To get Crosshair Cursor ==> While in any painting/editing tool, turn Caps Lock on
- Decrease/Increase brush size ==> [ or ]
- Decrease/Increase hardness of brush ==> Shift–[ or Shift–]
- Switch between preset brushes ==> < or >
- Open Brushes pop-up panel ==> Right–click in image window
- Erase to History panel's source state ==> Alt–Eraser
- Cycle down or up through blend modes ==> Shift–Plus(+) or Minus(–)
- Change to a specific blend mode ==> Shift–Alt–letter (i.e.: N=Normal, M=Multiply, etc.)
- Create fixed color target from within a dialog box ==> Shift–click in image window
- Delete fixed color target ==> Alt–click on target with Color Sampler tool
- Create new Spot Color channel from current selection ==> Ctrl–click on New Channel button in Channels panel
Pen Tool & Paths
- To get Direct Selection tool while using Pen tool ==> Ctrl
- Switch between Add Anchor and Delete Anchor Point tools ==> Alt
- Switch from Path Selection tool to Convert Point tool when pointer is over anchor point ==> Ctrl–Alt
- To select a whole path w/Direct Selection tool ==> Alt–click
- Convert path to a selection ==> Ctrl–click on path name (in Paths panel)
Panels
- Show/Hide Brushes panel ==> F5
- Show/Hide Color panel ==> F6
- Show/Hide Layers panel ==> F7
- Show/Hide Info panel ==> F8
- Show/Hide Actions panel ==> Alt–F9
- Open Adobe Bridge ==> Ctrl–Alt–O
Monday, October 8, 2018
Advantage of Test Automation framework
- Reusability of code
- Maximum coverage
- Recovery scenario
- Low-cost maintenance
- Minimal manual intervention
- Easy Reporting
Test Automation Frameworks:
- Module Based Testing Framework
- Library Architecture Testing Framework
- Data Driven Testing Framework
- Keyword Driven Testing Framework
- Hybrid Testing Framework
- Behavior Driven Development Framework
#1) Module Based Testing Framework
Module based
Testing Framework is based on one of the popularly known OOPs concept –
Abstraction. The framework divides the entire “Application Under Test” into a
number of logical and isolated modules. For each module, we create a separate
and independent test script. Thus, when these test scripts took together builds
a larger test script representing more than one modules.
These modules are
separated by an abstraction layer in such a way that the changes made in the
sections of the application doesn’t yield affects on this module.
#2)
Library Architecture Testing Framework
The
Library Architecture Testing Framework is fundamentally and foundationally
built on Module Based Testing Framework with some additional advantages.
Instead of dividing the application under test into test scripts, we segregate
the application into functions or rather common functions can be used by the
other parts of the application as well. Thus we create a common library
constituting of common functions for the application under test. Therefore,
these libraries can be called from the test scripts whenever required.
The
basic fundamental behind the framework is to determine the common steps and
group them into functions under a library and call those functions in the test
scripts whenever required.
Example: The login steps can be combined
into a function and kept into a library. Thus all the test scripts those
require to login the application can call that function instead of writing the
code all over again.
#3) Data
Driven Testing Framework
While
automating or testing any application, at times it may be required to test the
same functionality multiple times with the different set of input data. Thus,
in such cases, we can’t let the test data embedded in the test script. Hence it
is advised to retain test data into some external database outside the test
scripts.
Data
Driven Testing Framework helps the user segregate the test script logic and the
test data from each other. It lets the user store the test data into an
external database. The external databases can be property files, xml files,
excel files, text files, CSV files, ODBC repositories etc. The data is
conventionally stored in “Key-Value” pairs. Thus, the key can be used to access
and populate the data within the test scripts.
Note: The test data stored in an external file can belong to the
matrix of expected value as well as the matrix of input values.
Example:
Let
us understand the above mechanism with the help of an example.
Let
us consider the “Gmail – Login” Functionality.
Step 1: First and the foremost step are to
create an external file that stores the test data (Input data and Expected
Data).

Step 2: The next step is to populate the test data into
Automation test Script. For this purpose, several API’s can be used to read the
test data.

The above method helps to read the test data and the below test
step helps the user to type in the test data on the GUI.
element.sendKeys(obj_value.get(obj_index));
#4)
Keyword Driven Testing Framework
The
Keyword driven testing framework is an extension to Data driven Testing
Framework in a sense that it not only segregates the test data from the
scripts, it also keeps the certain set of code belonging to the test script
into an external data file.
These
set of code are known as Keywords and hence the framework is so named. Keywords
are self-guiding as to what actions need to be performed on the application.
The
keywords and the test data are stored in a tabular like structure and thus it
is also popularly regarded as Table driven Framework. Take a notice that
keywords and test data are entities independent of the automation tool being
used.
Example Test case of Keyword Driven Test Framework

In the above example, keywords like login, clicking and verify
Link are defined within the code.
Depending upon the nature of application keywords can be derived. And all the keywords can be reused multiple times in a single test case. Locator column contains the locator value that is used to identify the web elements on the screen or the test data that needs to be supplied.
Depending upon the nature of application keywords can be derived. And all the keywords can be reused multiple times in a single test case. Locator column contains the locator value that is used to identify the web elements on the screen or the test data that needs to be supplied.
All
the required keywords are designed and placed in the base code of the
framework.
#5)
Hybrid Testing Framework
As
the name suggests, the Hybrid Testing Framework is a combination of more than
one above mentioned frameworks. The best thing about such a setup is that it
leverages the benefits of all kinds of associated frameworks.
Example of Hybrid Framework
Test sheet would contain both the keywords and the Data.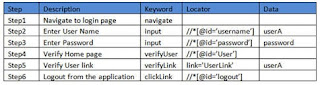
In the above example, keyword column contains all the required keywords used in the particular test case and data column drives all the data required in the test scenario. If any step does not need any input then it can be left empty.
#6) Behavior Driven Development Framework
Behavior Driven Development framework allows automation of functional validations in easily readable and understandable format to Business Analysts, Developers, Testers, etc. Such frameworks do not necessarily require the user to be acquainted with the programming language. There are different tools available for BDD like cucumber, Jbehave etc. Details of BDD framework are discussed later in Cucumber tutorial. We have also discussed details on Gherkin language to write test cases in Cucumber.
Example of Hybrid Framework
Test sheet would contain both the keywords and the Data.

In the above example, keyword column contains all the required keywords used in the particular test case and data column drives all the data required in the test scenario. If any step does not need any input then it can be left empty.
#6) Behavior Driven Development Framework
Behavior Driven Development framework allows automation of functional validations in easily readable and understandable format to Business Analysts, Developers, Testers, etc. Such frameworks do not necessarily require the user to be acquainted with the programming language. There are different tools available for BDD like cucumber, Jbehave etc. Details of BDD framework are discussed later in Cucumber tutorial. We have also discussed details on Gherkin language to write test cases in Cucumber.
Components of Automation Testing Framework
Though the above pictorial representation of a framework is
self-explanatory we would still highlight a few points.
1.
Object Repository: Object
Repository acronym as OR is constituted of the set of locators types associated
with web elements.
2.
Test Data: The
input data with which the scenario would be tested and it can be the expected
values with which the actual results would be compared.
3.
Configuration File/Constants/ Environment
Settings: The file stores the information regarding the application URL,
browser-specific information etc. It is generally the information that remains
static throughout the framework.
4.
Generics/ Program logics/ Readers: These
are the classes that store the functions which can be commonly used across the
entire framework.
5.
Build tools and Continuous Integration: These
are the tools that aids to the capabilities of the framework to generate test
reports, email notifications and logging information.
Conclusion
The
frameworks illustrated above are the most popular frameworks used by the
testing fraternity. There are various other frameworks also in the place. For
all the further tutorials we would base on the Data Driven Testing Framework.
In this tutorial, we discussed the basics of an Automation
Framework. We also discussed the types of frameworks available in the market.
tags;
#selenium, #testautomationframework, #framework, #automation, #testing, #softwaretesting
#selenium, #testautomationframework, #framework, #automation, #testing, #softwaretesting
Thursday, October 4, 2018
Remedy Swollen Feet/Ankle
Below are some remedies for Swollen Feet/Ankle
Remedy A
- English: Mix native ginger with alcohol and smear in swollen feet/ankle
- Tagalog: Ipahid ang native na luya mixed in alcohol sa manas na binti)
Remedy B
- English: Mix native ginger with kerosine and smear in swollen feet/ankle
- Tagalog: Ipahid ang native na luya mixed in kerosine sa manas na binti
Remedy C
- English: Boil water with salt (2liters water 5or10 tbl spoon of salt) then remove boiling water soak swollen feet/ankle(temperature of boil water depends on how you can handle the heat).
- Tagalog: Uminit ng tubig na my asin(2litrong tubig 5or10 kutsarang asin) tangalin and mainit na tubig and ibabad ang manas na paa(ibabad ng paa sa init ng tubig na kaya mo tiisin)
tags:
#health, #remedy, #swollen, #swollenfeet, #swollenankle, #ankle, #manas na paa, #feet, #health remedy.
Tuesday, October 2, 2018
Change RAM in Virtual Box on the installed OS
Follow steps below to expand/change RAM in Virtual Box/Virtual Machine for the installed OS
- Power down the VM (the guest has to be off, not just not running but with a saved state).
- Discard 'Saved State'
- Open the VM's settings.
- Open the System tab.
- Change the "Base memory" value to however much RAM you want.
tags:
#virtual box, #virtualbox, #RAM, #OS,
Fundamental of a good presentation
Tips and Tricks in delivering good and effective Presentation to your audiences:
tags:
tags:
#speaker, #presentation, #effective, #report, #teach, #audience, #tips, #tricks
"This Site Can’t Be Reached"(Solved)
If you getting the error only with the chrome then you can follow these steps;
Make sure you are using updated Google Chrome version of your Windows.
- Go to Chrome settings > Show advanced settings > Privacy column
- Look for "Use a prediction service to load pages more quickly"
- Select its checkbox to allow DNS prediction.
- Restart the Chrome browser only & check.
tags:
#This Site Can’t Be Reached, #fixed, #ThisSiteCan’tBeReached
Tuesday, September 25, 2018
List of Movies Romance/Drama
- When We First Met - 2018
- Irreplaceable You - 2018
- You Get Me - 2017
- The First Time - 2012
- The Fault In Our Stars - 2014
- Stuck In Love - 2012
- Midnight Sun - 2018
- To All The Boys I've Loved Before - 2018
- Me Before You - 2016
- Kissing Booth - 2018
- Love, Simon - 2018
- Everything, Everything - 2017
- Forever My Girl - 2018
- Before I Fall - 2017
Monday, September 3, 2018
How to check computer serial number using cmd
Check computer serial number using CMD
1. Open CMD
2. Type the command: WMIC BIOS GET SERIALNUMBER, then press enter.
Tags:
cmd, serial number,
1. Open CMD
2. Type the command: WMIC BIOS GET SERIALNUMBER, then press enter.
Tags:
cmd, serial number,
Thursday, July 12, 2018
Decoding the Intraday Trading Indicators
Moving Averages:
If short-term averages are exceeding the long-term averages, it indicates a bullish market trend. Traders may take a buy call with specific strategies like stop loss either at the long-term moving average or retracement support, and vice versa. This intraday tip can help traders earn decent profits through intraday trading.Bollinger Bands:
If the stock is trading at a price below the Bollinger Band lower line, there is potential for the price to increase in the future. Traders can choose to take a buy position. On the other hand, if the current stock price is over the upper line, traders can sell the share.Momentum Oscillators:
If the share price has reached a historical high, and the level of the oscillator is not the same as the price, it is indicative of slowly decreasing demand. This also indicates the possibility of a stock price fall. And the opposite is true for stock price rise.RSI:
Most analysts will recommend traders to sell the stock when the RSI touches 70 and a buy recommendation when it falls to 30. However, all stocks may not adhere to this pattern, so it is important to analyse the volatility and RSI history before making a decision.
Using intraday trading indicators help in averting risk and placing appropriate trades based on technical analysis and market sentiments. Angel Broking Angel Eye offers detailed charts and stock analysis reports that comprise these trading indicators. These tools help in planning an effective trading strategy, while minimizing risks.
Tags:
#indicator #stocks #trade #daytrade
Sunday, July 8, 2018
Thursday, May 17, 2018
Photoshop Shortcuts
Photoshop short cut
Deselect layer ctrl+d
select Layer ctrl+t
resize selected layer shift drag size
Deselect layer ctrl+d
select Layer ctrl+t
resize selected layer shift drag size
tags:
#photoshop #resize #layer #photo #edit #picture
Tuesday, April 24, 2018
Fund Your COL account by doing a Bills Payment transaction
Fund Your COL account by doing a Bills Payment transaction
- Under Payments & Reloading, click Bills Payment, click Pay Bills Today
- Under Pay, choose your CitisecOnline Account
- Enter the amount
- Choose BPI account from where payment will come from
- Click Submit
#fund #col #bpi #colfinancial #trade #stocks
Enroll Your COL account into BPI Express Online Bills Payment facility
Enroll Your COL account into BPI Express Online Bills Payment facility
- Log on to www.bpiexpressonline.com
- Enter your username and password
- Under Payments & Reloading, click Bills Payments, click Enroll all other Bills
- Enter your BPI account number and Joint Account Indicator No. (this is the 2-digit no. located at the lower right hand corner of your ATM card right across your name)
- Under Bill information, select CITISECONLINE.COM INC. (COL) as the enrollee merchant
- Enter your CitisecOnline account number (8-digit code username) on the space under Reference Number (I entered mine with the dash in it xxxx-xxxx and it worked fine)
- Click Submit
#bpi #col #colfinancial #stocks #financial #enroll
Subscribe to:
Posts (Atom)